Monday, September 3, 2012

September 2012

Spent time away from beading this Summer to spend some quality time with my beautiful Grand-daughters and visiting my home state, Ohio. One of the best places to see is the museum at Wright Patterson Air Force base in Dayton, Ohio. The museum has three airplane huts full of planes from the earliest Wright Brothers plane, planes used in war time to our modern day airplanes. It was the best place to explore and enjoy all for free. Here is a link to more information: http://www.nationalmuseum.af.mil/
While in Ohio I did manage to visit a couple of bead shops Ally Beads in Milford, Ohio and the Bead Circus in Lebanon, Ohio. I found a lovely Sardonyx at Ally Beads and cute earring kits at the Bead Circus.
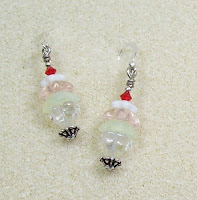


Ice Cream Sundae Earrings

Fairy Princess Earrings


Since returning home I have been trying to catch up on my beadwork and projects for the Seedbeadersters Bead Alongs.
The Seedbeadersters Bead Along for June/July was to choose a project from one of the popular bead magazines. I selected the Dragon Dance Bracelet designed by Csilla Csirmaz from Beadwork Magazine the April/May 2012 issue. The beads I used for the bracelet were 3mm Cubes in a Muted Clay frosted finish #F463K, size 8 Hex beads in a Brownstone iridescent  #648, size 11 seed bead in Jade Sheen opaque luster finish #431, size 11 seed bead in Metallic permanent finish Red Brick #489, size 15 seed beads in Glazed Ginger #5 and Silver-lined Gold #3, Charlotte’s in 24K Gold plate, and 6mm Crystal Pearls in Bordeaux.
The stitch used to make the bracelet was flat Herringbone. I have made other Herringbone pieces and did not feel making the bracelet would be a problem. Not so. The biggest issue with making the bracelet was the amount of beading thread which showed between the beads and fitting the 6mm Pearls into the inside curves on the bracelet. To solve these issues I made minor alterations to the design to allow for fit and composition. The bracelet shape is a wave. Two sections make one complete wave. The inside curve of the wave is designed to be made using two colors of size 15 seed beads. I replaced one of the size 15 colors with the size 11 in the Jade Sheen color, thus increasing the size of the inside wave. The original design used a size 11 and a size 15 coming from the cubes along the outside curve of the wave. I prefer not to have a lot of thread showing when I bead so I changed the design creating a turnaround using the two colors of size 11 seed beads and the Gold Charlotte bead; this added a dragon spine look to my bracelet. To increase the length of the bracelet for my wrist size I added one more row to each wave section. The original design used 3 full waves to make the bracelet, for my bracelet I needed four full waves and a half.
I will probably make this bracelet again for my Daughters and I think I will try replacing the size 8 Hex bead with a regular size 8 seed bead since Hex beads are known to cut through beading thread.
Here is the picture of my finished bracelet.

In August the Seedbeadersters project was the lovely "Sparkle, Dash and Dot Bracelet" designed by Carol Cyphers from her book Mastering Beadwork. The bracelet is made with the Dutch Spiral technique and has a branched fringe closure. There is also three part video tutorial for this bracelet on You Tube made by Off the Beaded Path with Carol Cyphers’ permission.
Part 1 shows how to make the basic bracelet, parts 2 and 3 show how to make the closure.
The beads for this bracelet include size 11 seed beads, size 8 seed beads, and 4mm Crystals. Substituting Czech glass rounds or pearls for the 4mm Crystals leads to many different color variations as can be seen in the bracelets made by members of the Seedbeadersters.

Here is the photo of the Dutch Spiral “Sparkle, Dash and Dot Bracelet” I made.


Seedbeadersters Sparkle, Dash and Dot Bracelets Photo

September’s project is a Flat Herringbone stitched bracelet “Herringbone Sparkle” designed by Ruby from Ruby’s website http://www.rubysbeadwork.com/. This is a beautiful bracelet and I can’t wait to see all the different color and bead variations the Seedbeadersters will create. I have finished mine but will be making two more and saving them for Holiday gifts.


It won’t be long before the Holidays are upon us and I need to get moving on creating my annual ornaments and gifts for Christmas.
I have managed to finish one ornament cover, “Christmas Hope” and have a couple more ideas bouncing around in my noggin. Here is a picture of my “Christmas Hope” ornament cover and I am off to another project.
Have fun with your beads and come join us at Seedbeadersters@Yahoogroups.com


Tuesday, May 15, 2012

May 2012

Shopping for beads is always fun and being able to go to a bead show adds to the fun. I recently attended the Greater Kansas City Bead Society’s annual Bead Blast. I have been before but this year I decided to take a Bead Embroidery class with a friend. Last year I made a bead embroidered cuff style bracelet after reading up on bead embroidery; the bracelet was my first bead embroidered piece. I took the Bead Embroidery class with the idea of learning additional bead embroidery techniques and increasing my beading skills. The instructor had taught at the Bead & Button show and this was a good opportunity to learn from a pro. The kits available for the class included a 25mm by 18mm semi-precious gemstone cabochon pre-glued to pre-dyed Lacey Stiff Stuff, Delica 11s color coordinated to the gemstone, size 15 seed beads, small square of light weight plastic, Ultrasuede backing material, combination pin/pendant finding, Fireline and Nymo thread, bead mat and needles. In addition to the kit the instructor provided an assortment of embellishment beads. I chose a Lapis cabochon kit.  Below is a picture of my finished pendant/brooch piece. Due to timing constraints and other issues I completed my piece at home and used beads from my bead stash for the embellishments. The class was fine, even though I did not learn any new bead embroidery techniques I did enjoy the time spent with my friend.


After taking the Bead Embroidery class I did some more research on line looking for alternate methods for finishing the edges on a bead embroidered piece. I found Jamie Cloud Eakin’s book Dimensional Bead Embroidery. I really like this book. It is chockfull of information on bead embroidery techniques and what you need to know to create a lovely piece of bead embroidery, plus it contains information and instructions on 10 different edge finishing stitches. I used the “Crowns Point Edge” on my pendant. The first chapter shows and explains what tools are needed to do bead embroidery, basic bead embroidery techniques are explained and illustrated in chapter two, chapter three is on getting started and designing, and chapter four is on using components in bead embroidery. Chapters five through eight are devoted to the different stitches used in bead embroidery. Each stitch is illustrated and explained in a step by step format. The last chapter contains nine projects. The projects are also well illustrated and have step by step instructions. There are photos of finished pieces all through the book, plus a gallery in the back for inspiration.


The Beadwork Beaded Bead contest is a continuing project. The Beadwork pattern for the third bead in the series can be found on pages 20 through 22 in the June/July 2012 issue. The bead is the Stargazer  Beaded Bead designed by Florence Turnour. I have made the bead as it was designed and also a smaller version. The bead, as designed, has a 1 inch diameter. Making the beaded beads is adding to my beading skills but I am disappointed to see the size of the beaded beads increasing. In the contest description you are suppose to make a piece of jewelry. In my opinion having such large beads limits the scope of the type of jewelry item you could make. I wanted to try making a bracelet; I would not put a 1 inch diameter bead on a bracelet. Below is a photo of the beads I made. The large bead is the beaded bead using the 4mm size foundation beads as listed in the pattern. The smaller bead is my version using size 8 seed beads for the foundation base.


In my last blog update I mentioned I wanted to try making a bracelet using the No Warp Ends method on my Best of All Loom. Below is a photo of the finished bracelet. I am testing Velcro for a closure on this bracelet to see how it holds.


I made another Right Angle Weave choker necklace based on Larry Linson’s original design. I decided to make a color matched bracelet. I used Right Angle Weave and the same beads to make the bracelet. I did not want to use the dangles on the bracelet because I feel they would tend to catch on things and cause the bracelet to break, but I did want to include the smaller beads in the design of the bracelet. The necklace and bracelet are pictured below.


I am heading back to my bead mat with more projects to do.


Sunday, April 22, 2012

April 2012

Update on the Seedbeadersters: The May Bead Along is starting and the theme is YOU PICK.

Members can select a project from the Bead Patterns and Tutorial folder on the Seedbeadersters Group Link Page. The patterns and tutorials cover a multitude of beading techniques. A member can try out a new technique or revisit an old one.

OR

Members may choose to make an Amulet Bag. There are 40+ links of Amulet Bag Patterns available to the members and the techniques used to make the bags include Peyote, Tubular Peyote, Netting, Knitting, and Loom.

Here is a photo showing a few of the necklaces made by Seedbeaderster members for the April Bead Along. The tutorial for the necklace was provided by Seedbeaderster member, Larry Linson.
If you like to play with seed beads please join us at http://groups.yahoo.com/group/seedbeadersters/ or join our group seedbeadersters-subscribe@yahoogroups.com

Have fun beading!

Wednesday, April 11, 2012

April Loom Project

Finished my loom project a “Rose Cell Phone Bag”. This should help protect my cell phone in my purse and keep me from accidentally turning it off or calling someone. I used Delica beads to stitch the bag and size 15 seed beads to close the sides. I created a felt inner bag to keep the phone from being scratched. Here is the picture of the finished bag.


Here is a photo showing the completed project on the loom. I used masking tape across the bottom row of paper clips to keep from snagging the thread while stitching.

I really liked working with the No Warp loom. It was easier to use and I was able to work faster. The only drawback with using paperclips is having small loops of thread along the end beads after removing the piece from the loom.  On the cell phone bag I added a row of beads to each end using Square Stitch and pushing the loops to the inside of the bag.
I have a Versa Loom but did not use it for the cell phone bag. The Versa Loom was not wide enough to accommodate the number of beads required.
I plan to make a loom stitch bracelet with the No Warp loom, but this time I am going to setup the warp threads using beads in the same manner as on the Versa Loom.

Wednesday, April 4, 2012

Earl April 2012

Sunshine and Beads what a great way to have Fun!
One of the seedbeadersters  found the German web site FantasiaBeads http://www.fantasiabeads.de/index.php?XTCsid=93d688a992a11403e2138594b0c7d48f  where she found a tutorial to make a beaded crystal Sea Horse, titled Luis. Her sea horse was so lovely I decided to make one for myself.  The tutorial calls for 3mm crystals.  Not having 3mm on hand I switched to 4mm. I used Metallic Gold Iris seed beads in size 8 and 11, gold metallic seed beads in size 15, and Golden Shadow Swarovski 4mm crystals. With all the gold beads I used I have dubbed him King Luis. Here is his picture.


The Seedbeadersters are busy working on the RAW Choker necklace and finishing up previous projects. Some of the members want to make an Amulet bag or a netted bag with beads as our next project. To that end I am trying to locate free tutorials for both types of beaded bags. I have also designed a bag worked in Tubular Peyote and will make the pattern available to the seedbeaderster members. Plus I am looking for an alternative project for those who do not want to make a beaded bag.
In the meantime I am working on a loom project. For this project I am using the No Warp Ends method. My very handy Son In-law built the loom for my birthday. He used The Best Loom of All as a starting point. The loom he made is smaller but is just right for my looming needs. Here is a photo of the finished loom. As you can see in this photo I have started my project. I’ll post another photo when I have it finished. The plans for the Best Loom of All can be purchased from GGs Design on Art Fire. http://www.artfire.com/ext/shop/studio/GGsDesigns

Friday, March 16, 2012

Spring 2012


Spring is definitely on overdrive here in the Midwest.
I have finished the Twisted Tubular Herringbone necklace based on Doris Coghill design “Fresh Twist.” I ended up making two necklaces and I am pretty sure I will be making a third. When you have two daughters one is never enough and two is okay, but three is the best, especially if you want to have one of your own.
Here are photos of the two I have completed.


I have also managed to make two beaded beads based on the Beadwork Beaded Bead Contest designs. The first bead is “Seeing Stars” designed by Melinda Barta and the second is “Cluster Beaded Bead” designed by Gwen Fisher.
The “Cluster Beaded Bead” makes a large size bead if you use 8mm beads as given in the materials list. I am not a huge fan of large size beads so I replaced the 8mm with 6mm and adjusted the size of seed beads accordingly.

Not sure yet if I will actually enter the Beadwork Contest but I am having a good time making the beads.
Here is the photo of the two beads.


The April Project for the Seedbeadersters is ready to roll. The project is an “Embellished Right Angle Weave Necklace” designed by Larry Linson a Seedbeadersters member. This is a lovely choker style necklace. The instructions for the necklace are in the Seedbeadersters files but you need to belong to the group to access the file. seedbeadersters-subscribe@yahoogroups.com
Here is a photo of the April Bead Along Project.


Off to my bead stash. Have fun playing with your beads.

Saturday, March 3, 2012

March 2012

Good Day!


Happy to report the Seedbeaderster members are going gangbusters in creating some very pretty Russian Spiral Bracelets. This Bead Along will be coming to an end soon and some have already completed or are busy working on the Tubular Herringbone Necklace which is our March project. If you like to bead please check out our home page at http://groups.yahoo.com/group/seedbeadersters/ and you can join the fun.
This photo showcases just some of the Seedbeadersters fabulous Russian Spiral bracelets.


Here is a photo of my latest bead project; Splendor Bracelet and Earrings. I used Ruby toned Czech Fire-Polished beads and Metallic Gold Seed beads.
The Tutorial for the bracelet includes instructions and diagrams to make adjustments for different lengths of bracelets. The earrings are designed to attach to ear post, ear wires or clip type earring findings. The tutorials are available in my Art Fire Studio: CSD Design http://www.artfire.com/ext/shop/studio/CSDDesign


I have started my Tubular Herringbone and it is a variation of the necklace designed by Doris Coghill called "Fresh Twist" from Beading Daily's Favorite Stitches and Beadweaving Techniques: 5 Free Beadwork Beading Patterns for Seed Beads
The listed materials for this necklace are size 8 seed beads, a Lampwork focal bead, and size 11 triangle beads. I like the way the Tubular Herringbone looks with the addition of the size 11 triangles. I made a test piece using triangles I have. The trial piece worked up nicely; but the colors I have need more oomph. I took the sample apart and am using size 11 seed beads as replacements for the triangles.  The piece is working up quickly and I hope to have it finished in a few days.

Sunday, February 26, 2012

February 2012 CSD Design Bead Bits


WELCOME TO CSD Design Bead Bits!

I started my journey with beads in 2005. Working with beads allows me time to be creative and share what I do with family and friends.

In 2008 I started Seedbeadersters a Yahoo Group. The focus of this group is using seed beads to make jewelry, accessories, ornaments and other beaded objects. This year the members are working on Bead Along projects and a Beaded Bead Challenge.

In January the Bead Along project was the Vanguard Crystal Ribbon Bracelet. I designed the bracelet and the members who participated had a lot of fun. The variety of colors they chose made some very lovely bracelets.

The February project is a Russian Spiral bracelet using two colors of size 8 Hex beads, one color of size 8 seed beads, and size 11 seed beads. Once again the members are having a good time and producing pretty bracelets.

In March the group will be working on a Tubular Herringbone necklace. There are some good tutorials on the web and in several bead publications. I can’t wait to see what the members create.

The Bead Challenge for the Seedbeadersters is based on the Beaded Bead Contest Beadwork magazine is running for their 15
th anniversary. The members do not have to participate in the contest to do the challenge, but I think it would be great if the members did.

If you like to be creative and have fun come; join us at the Seedbeadersters.
seedbeadersters@yahoogroups.com
Beading friends liked my designs and asked for tutorials. I started doing tutorials and giving them away to friends and members of the Seedbeadersters. I was encouraged by family and friends to sell my tutorials and this led to opening a studio on Art Fire. My studio is CSD Design BeadworkTutorials http://www.artfire.com/ext/shop/studio/CSDDesign
I recently designed a Starflower Reversible Pendant with gold and silver seed beads. One side of the pendant is gold and the other side is silver. It's like having two necklaces in one. All I have to do is turn the necklace around to change the look. I am currently working on a new bracelet design and will have the tutorial available soon.